Jump to a question in this guide
- Why can one wet patch have several different causes?
- What should I do first when I find water?
- Which parts am I looking at under the sink?
- Why can a supply leak continue when the tap is off?
- What do the nut and washer on a drain joint actually do?
- Could rain or snowmelt be reaching the same wet patch?
- Can a cold pipe make water without leaking?
- What visible signs deserve a closer look?
- What can the water meter actually tell me?
- Which observations help without creating another leak?
- What do moisture meters and thermal cameras add?
- If the leak stops, are the cabinet and wall finished too?
- What should the repair cover beyond the leaking part?
- Which professional fits the problem, and what should their visit cover?
- What should I keep after the work?
- Supply pipes deliver pressurized water, drains carry used water away, and weather and condensation follow other routes.
- Describe where water first appeared and what was happening; the visible mark can be away from the source.
- Keep away from wet electrical equipment, unstable wet ceilings and water that may be contaminated.
- A meter measures passing volume; a thermal camera shows surface-temperature patterns. Neither locates every leak alone.
- Ask separately about the source repair, affected materials and the work needed to reinstate the room.
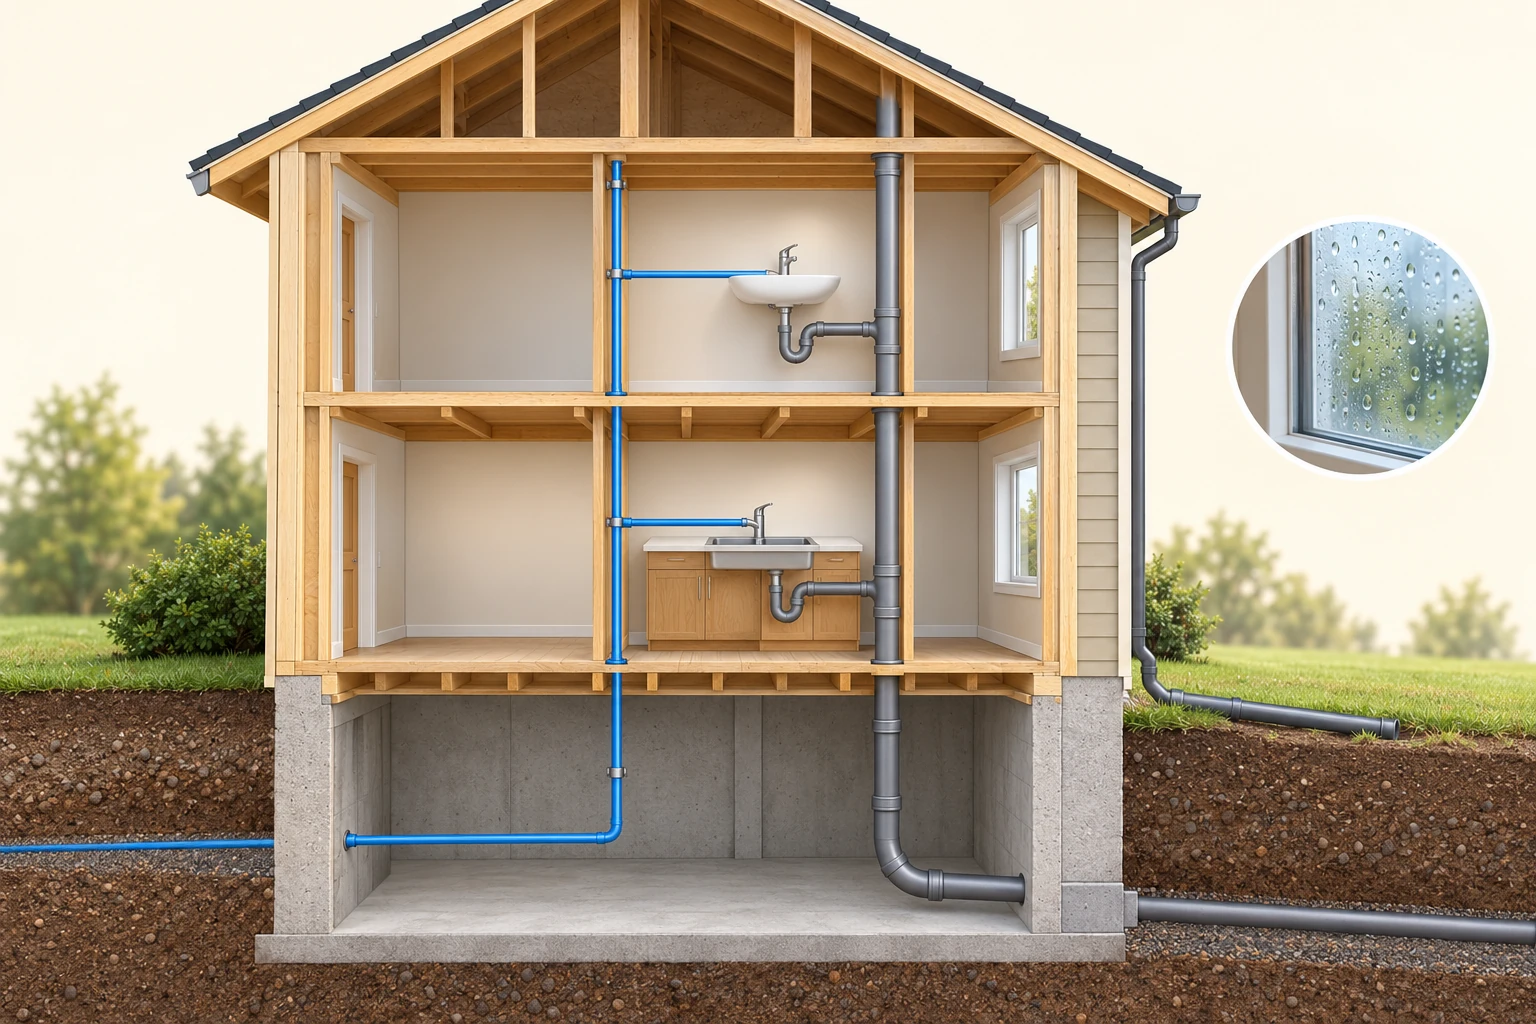
Cold-water supply brings water to the taps; separate drains carry used water away. The roof and downspout handle outside weather, while cold glass can collect condensation. This is a simplified cold-water example: hot water, other services and concealed continuations are omitted.
About this illustration
11 picture lessons appear beside the questions in this guide. Use them to understand the explanation, then consider what it means for your home.
Why can one wet patch have several different causes?
You open the cupboard for a cleaning cloth and find a wet cabinet floor. Or a brown ring appears on the ceiling below the bathroom. It is tempting to buy a new trap or arrange repainting immediately. First, work out which water route needs attention: repairing the nearest visible part can leave the real problem running.
Water arrives at a sink through pressurized supply connections and leaves through a separate drain. Rain and melting snow follow the outside of the building. Moist air can also leave liquid water on a cold surface. These routes can put water in the same room while needing quite different work.
The cutaway separates those jobs. Follow incoming water toward the fixture, used water away from it, and weather water along the building shell. Condensation belongs to the surrounding air and cold surface. The drawings explain possibilities; they do not assign a cause to a wet patch in your home.
Two observations make the first conversation much clearer: where water was first visible, and what was happening beforehand. “Water on the cabinet floor after washing dishes” is useful. “The drain has failed” adds a conclusion unless someone actually identified that source.
Use this guide to recognize the parts, understand why timing matters and choose a useful repair scope. Start with safety whenever water is spreading, electrical equipment is nearby, a ceiling looks unstable or contamination is possible. You do not need to reproduce the leak to deserve help.
Supply, drains, weather and cold glass do different jobs
Cold-water supply brings water to the taps; separate drains carry used water away. The roof and downspout handle outside weather, while cold glass can collect condensation. This is a simplified cold-water example: hot water, other services and concealed continuations are omitted.
Choose a part name to highlight its explanation below.
- Cold-water supply
The narrow blue route branches toward the two taps.
- Used-water drain
The larger grey route receives the sink drains and continues below the home.
- Outside weather
The gutter and downspout belong to a separate exterior route.
- Cold glass
The inset illustrates surface droplets, a different question from a leaking pipe.
Which water route is being investigated?
- Incoming supplyPressurized pipes and connections deliver water; a connected leak can continue while the tap is closed.
- Fixture drainageUsed water leaves the fixture; timing during ordinary use can help without identifying the source by itself.
- Weather entryRain or snowmelt enters or travels through the shell; the visible indoor mark can be away from entry.
- CondensationAir moisture becomes liquid at a cold enough surface; a wet pipe is not automatically a pipe leak.
Timing and location guide an investigation; more than one water route can be involved.
Further reading: City of Calgary · Water leaks and basic repairs; Natural Resources Canada · Keeping The Heat In, section 2: How your house works.
What should I do first when I find water?
Look at the situation from a dry, safe position before trying to reach a valve or photograph a stain. Water near a panel, outlets, baseboard heaters or other electrical equipment can make entering the area dangerous. Stay out and contact the local electrical utility for safe disconnection and qualified help. Do not cross wet flooring to operate a switch or unplug equipment. Ontario's Electrical Safety Authority explains this flood risk; the electrical contractor and reconnection process varies by province and utility.
Keep people away from a bulging wet ceiling and from water that may contain sewage. Stop unnecessary use of the affected fixture while arranging help. Getting a better photograph is less important than avoiding a fall, contaminated water or falling material. An active flow that you cannot safely limit needs an urgent response, not a prolonged household investigation.
If an identified household or fixture shutoff is safely reachable from dry ground, it may help limit a supply leak. Do not force an unfamiliar, damaged or seized valve. A working valve and a safe route to it matter more than knowing a handle's usual direction. Ask the utility or plumber for help when the valve does not work or you cannot reach it safely. Toronto's burst-pipe guidance distinguishes the household valve from the utility's service shutoff; those are different pieces of equipment.
For a rental or multi-unit home, notify the landlord or building manager promptly as well. A shutoff may serve other homes or equipment. Do not operate shared building valves based on a generic diagram. Explain which room is affected and whether water is spreading into another unit or common area.
Once immediate hazards are handled, a useful first description is simple: “Water is on the kitchen cabinet floor; I noticed it after washing dishes; I did not see where it emerged.” That tells the professional what happened without deciding the cause for them.
Which parts am I looking at under the sink?
The tap is where incoming water is delivered. Smaller supply connections bring water to it, often through separate hot- and cold-water routes. A local shutoff, where fitted, controls a supply connection. These parts are on the incoming-water side of the sink, so closing the tap does not necessarily remove pressure from the connected supply plumbing.
Name the parts beneath the sink
The narrow supply risers, local valves and braided hoses feed the tap; the larger tailpiece, curved trap and wall arm carry used water away. The upper hose connections are hidden in this cutaway. A wet cabinet floor does not by itself identify which route needs attention.
Choose a part name to highlight its explanation below.
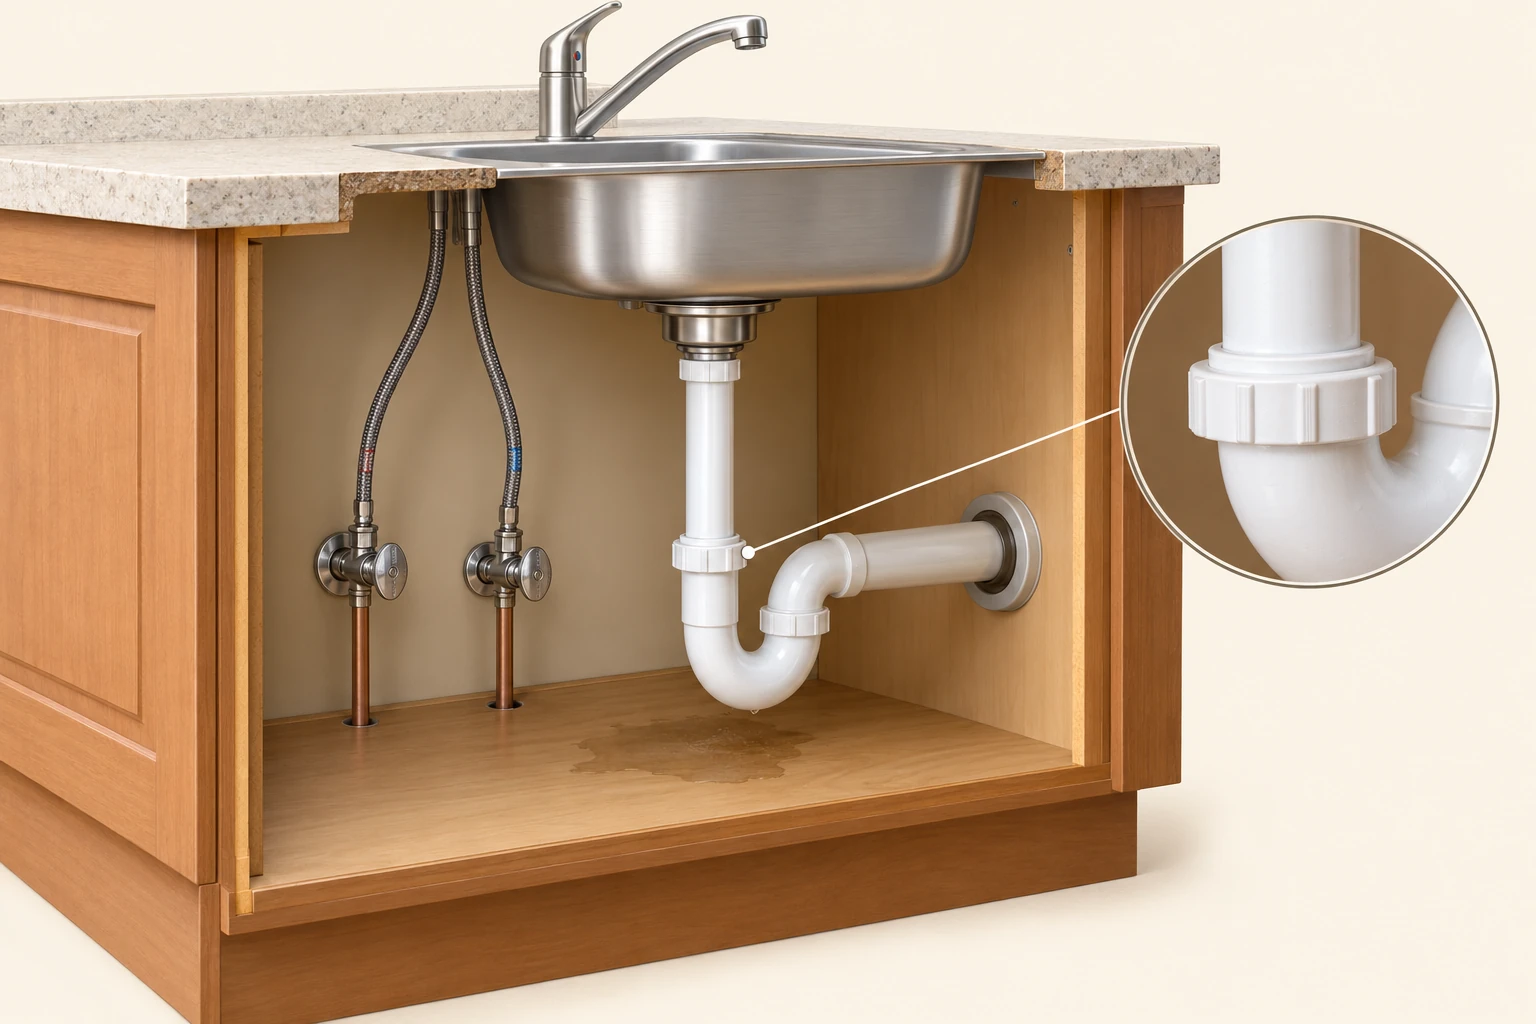
- Supply risers and valves
The smaller pipes and local controls belong to the incoming-water route.
- Braided hoses
The hoses rise toward the tap, with their upper connections concealed by the basin.
- Tailpiece and trap
The drain begins beneath the basin and passes through the curved trap.
- Wall arm
The downstream arm continues into the wall; its concealed route is not shown.
The drain opening belongs to the outgoing route. Water leaves the basin through the drain connection and pipe below it. The curved trap retains a water seal that helps separate room air from sewer gases. The downstream drain continues out of the cabinet. The trap is not another supply connection, even when everything is crowded into the same small space.
A drain connection may become wet while used water is passing through it, whereas a connected supply leak may continue between uses. Using a sink also uses its supply and can involve splashing, so timing helps the investigation without identifying the failed part by itself.
A dishwasher connection, pull-out tap hose or other accessory can add more routes. Use the picture to learn the names, then look at the arrangement actually installed in your home. A pipe's colour, a braided covering or a familiar-looking fitting does not establish its material, age or suitability.
Seeing a drop actually emerge at an incoming connection, a drain joint or the basin area would give more information than a puddle below all three. The cabinet picture shows a wet-looking floor without a visible leak source. Photograph the overall cabinet and the visible concern from a safe position, rather than reaching behind pipes to touch the suspected point.
A visible pipe can disappear into a wall, and a hose may end behind the basin. Say when the connection is hidden. Recognizing the exposed parts gives you useful names; it does not require you to move the appliance, remove a panel or trace concealed plumbing.
For a concern involving a buried drain or backup, ask what the proposed sewer-camera visit actually covers. A recording of a specified drainage stretch does not inspect every exposed fixture joint, measure supply pressure or explain all building moisture. The camera scope should match the question at hand.
Why can a supply leak continue when the tap is off?
The incoming water route is pressurized so it can deliver water when a fixture opens. A leak in that connected route can therefore continue while the tap itself is closed. The tap handle controls intended use at the tap; it is not the same as isolating every pipe and connection feeding it.
A droplet at a supply connector is a helpful location to report. Water tracking down from the tap above, condensation on a cold pipe or a splash can leave the same connector wet. A photograph of wet metal does not resolve those alternatives. Avoid calling a fitting “failed” unless the investigation actually identifies it as the source.
Calgary’s service-line guidance describes escaping water from the pressurized buried supply. Some leaks can be before the household meter, and water can remain underground rather than appearing at the surface. Unexpected water noise, pressure changes or water on the ground are reasons to contact the local utility; they are not a way to locate a buried break yourself.
A quiet household meter does not inspect every part of that buried route. The meter can only measure water that passes through its installed measuring point. Ask where your meter sits in relation to the suspected leak and who is responsible for the relevant service segment.
For the repair conversation, ask which supply component was identified, whether local isolation is available and who will arrange any utility shutoff. Keep service-line responsibility and emergency procedures local. Calgary and Toronto guidance describe their own systems; a private well, shared supply or another municipality can have a different arrangement.
What do the nut and washer on a drain joint actually do?
Some sink drains use a slip joint: one smooth tube enters a receiving fitting, a washer seals around the tube and an outside nut holds the parts together. That is why the visible nut and the actual sealing surface are different things. A wet nut does not automatically mean the nut itself is the failed part.
The washer seals around the tube
In this illustrated slip-joint example, the tapered washer seals around the smooth tube while the retaining nut holds it in its seat. The hollow tube and receiving fitting carry used water onward. Other drain joints differ; the drawing identifies parts rather than prescribing an adjustment.
Choose a part name to highlight its explanation below.
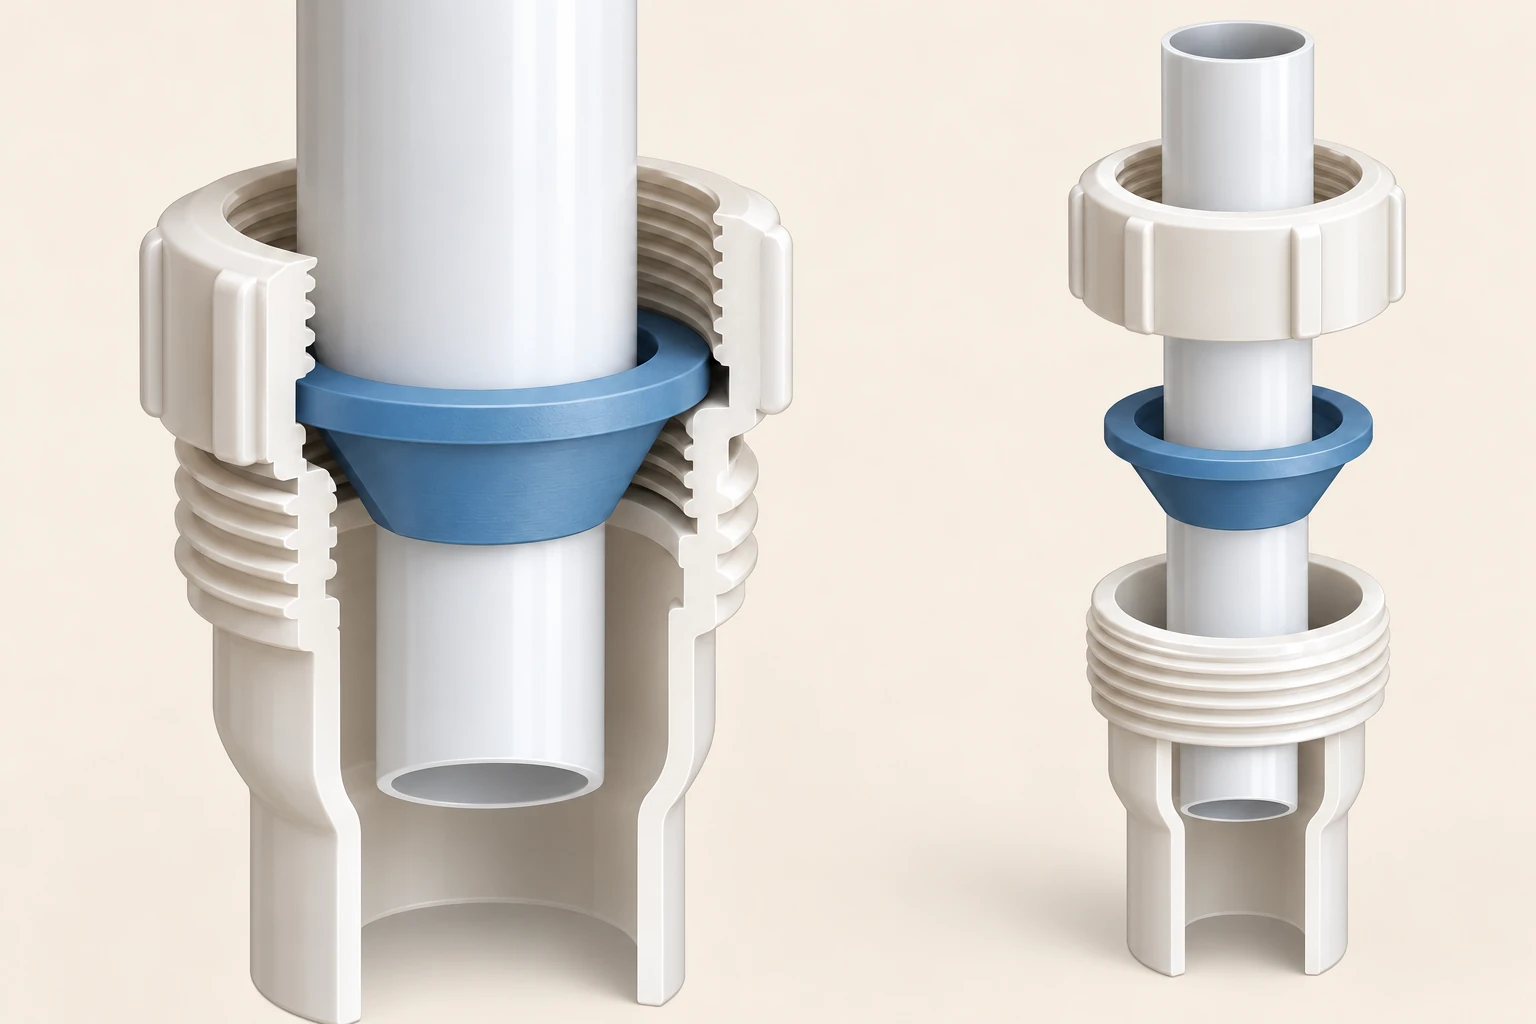
- Smooth tube
Water passes through the hollow bore; the fitting threads are outside that flow path.
- Tapered washer
The separate washer fits around the tube at the receiving fitting.
- Retaining nut
The nut engages the fitting outside the flow bore and retains the washer.
- Receiving fitting
Its hollow passage continues downstream; it is not a closed cup.
The close-up follows the example in Oatey’s June 2026 P-trap guide. The separate washer has a tapered face that seats into the receiving fitting. The retaining nut bears on the washer as it engages the fitting’s outside threads. Used water travels through the open tube bore; the washer’s job is to prevent it escaping around the tube at that connection.
The smaller exploded view separates those same parts so you can name them in a service conversation. It is an anatomical explanation, not an instruction to take your drain apart. Other joints can use different seals or construction; match the actual product before anyone chooses parts or a repair method.
Water appearing after sink use can involve this drain route, the supply used during the same activity, water around the tap or an appliance connection. A puddle below several parts does not choose between them. Tell the provider whether you saw water emerge at a joint or only found the surface beneath it wet.
Avoid tightening everything as a trial. The manufacturer warns that excess force can damage this kind of plastic connection. A plumber can assess the actual joint, surrounding support and relevant seal instead of treating every visible thread as the water seal. Stop unnecessary use of the affected fixture while the concern is being assessed.
Could rain or snowmelt be reaching the same wet patch?
The roof, outside walls, windows, doors and foundation form the weather-facing shell of the home. Their water-control layers and drainage routes have different jobs from indoor supply and drain pipes. Rain reaching a room is not necessarily coming from the nearest indoor pipe.
Water can move downward with gravity and sideways or upward through narrow spaces or porous materials by capillary action—the same basic wicking idea you see when a paper towel draws up a spill. That is why the place where a ceiling finally drips may be some distance from the point where water entered.
In the cutaway, an illustrative rain route enters higher in the building, follows a surface and reaches a lower visible mark. Follow the whole path. Repairing only the painted mark would change the finish while leaving the entry point unanswered. The drawn route is one possible mechanism; the roof, wall or window detail in your home needs its own assessment.
Tell the investigator about the weather that accompanied an event: rain, wind, thawing snow or a cold period followed by warming. Also say whether the same area has changed in dry weather. Weather timing helps select an investigation; it does not prove a roof defect or rule out plumbing and condensation occurring at the same time.
For a basement concern, include visible surface-water context from a safe ground-level position, such as where a downspout releases water. Do not climb onto the roof, enter an unsafe crawlspace or start digging to trace a route. Use the existing foundation, grading and roof guides for those systems; this guide's job is to separate possible sources before the work is chosen.
A ceiling mark can be away from the water entry
Water can travel along building surfaces before a ceiling shows a mark somewhere else. This stripped-away illustration shows one possible exposed route; it does not identify a failed flashing or the entry point in an actual home. Finding the source and replacing stained paint are different jobs.
Choose a part name to highlight its explanation below.
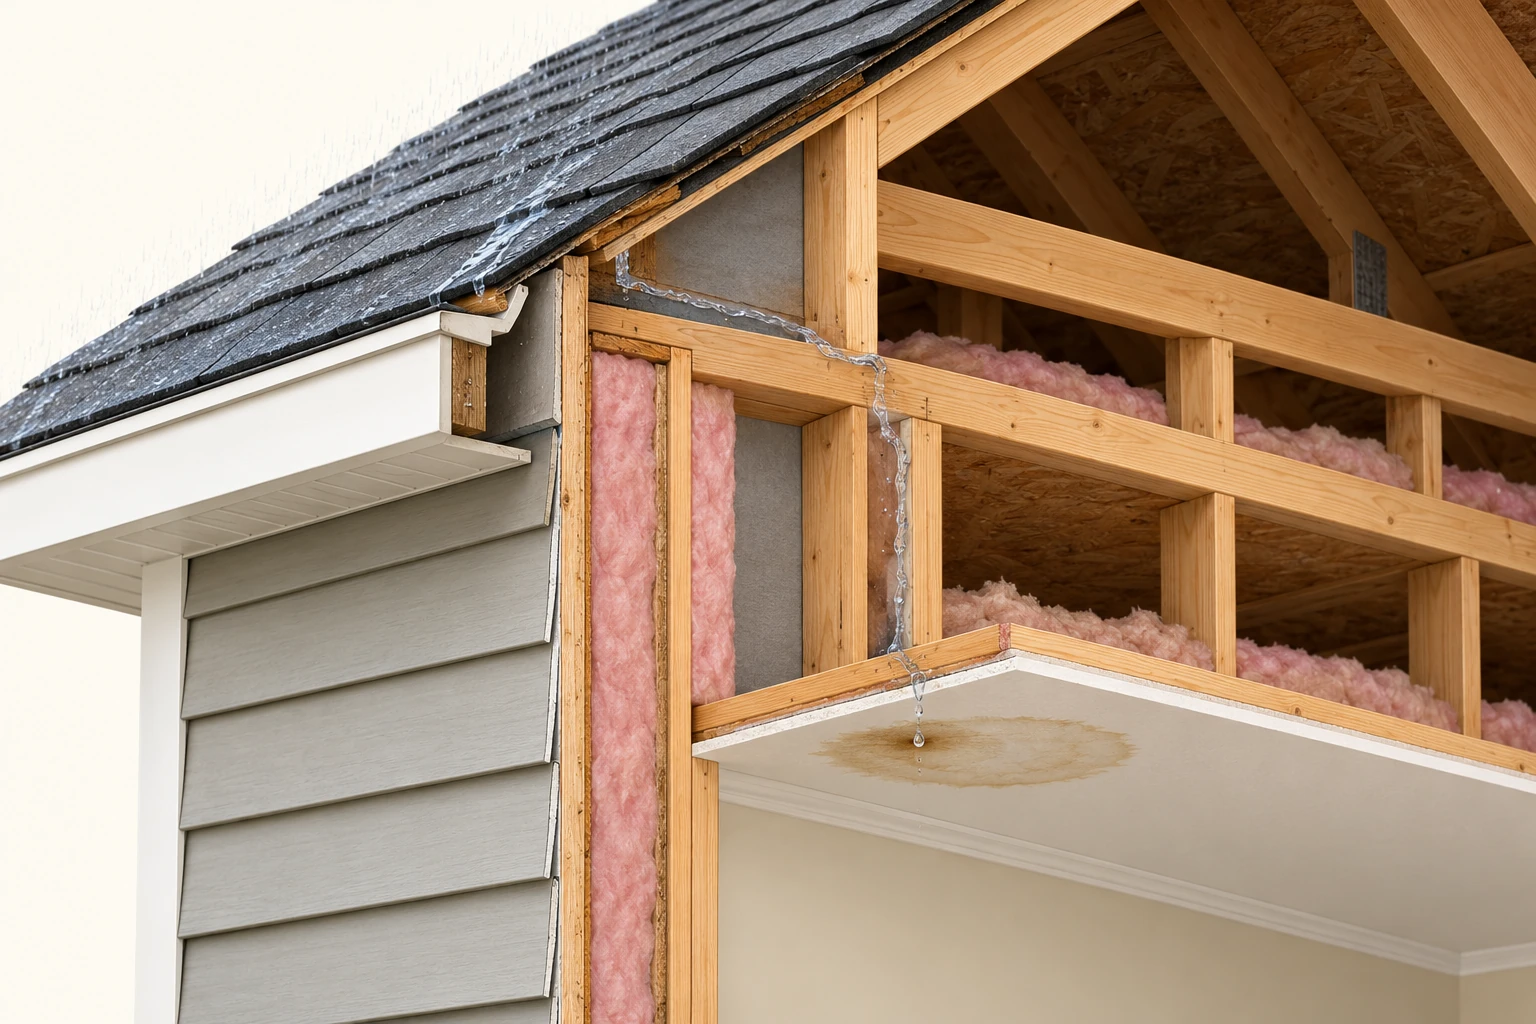
- Upper exposed surface
The thin trace illustrates a possible route along a surface.
- Framing edge
The visible route drops toward the ceiling rather than passing through solid timber.
- Ceiling mark
The visible stain is a location to describe, not a confirmed source location.
Can a cold pipe make water without leaking?
Yes. Water vapour in the surrounding air can turn into liquid droplets when it meets a surface cold enough for condensation. Room-side window droplets are a familiar example. A cold pipe can also collect surface moisture. The water is forming from the air at the surface rather than necessarily escaping through the pipe wall.
The detached teaching pieces show distributed beads on one pipe surface and one hanging drop at the underside of a connection on the other. They are open-ended specimens, not operating pipes. The picture shows droplet distribution, not temperature or a confirmed cause. Condensation and escaped water are two possibilities an investigation may need to distinguish.
Air moisture, surface temperature and the local conditions matter together. A comfortable room temperature does not tell you the temperature of a pipe, window or concealed surface. A humidity reading taken elsewhere in the home does not automatically describe the air beside that cold part.
Tell the investigator which surfaces were wet, when it was noticed and whether the pattern changes with seasons or equipment use. Do not wrap over an unexplained wet connection merely to hide droplets. Ask whether the proposed work addresses condensation, escaped water or both, and whether affected nearby materials need attention.
Condensation can also occur within parts of the building shell. That is one reason a recurring ceiling or wall concern may need building-science knowledge as well as a plumbing visit. A remedy chosen for an actual pipe leak may do nothing to correct a cold-surface moisture problem.
Compare surface droplets with a drop near a joint
A cold pipe surface can collect moisture from humid air. These detached specimens contrast widespread beads with a drop near a fitting, helping you describe the pattern. Neither appearance alone diagnoses condensation, a leaking joint or the actual pipe material in a home.
Choose a part name to highlight its explanation below.
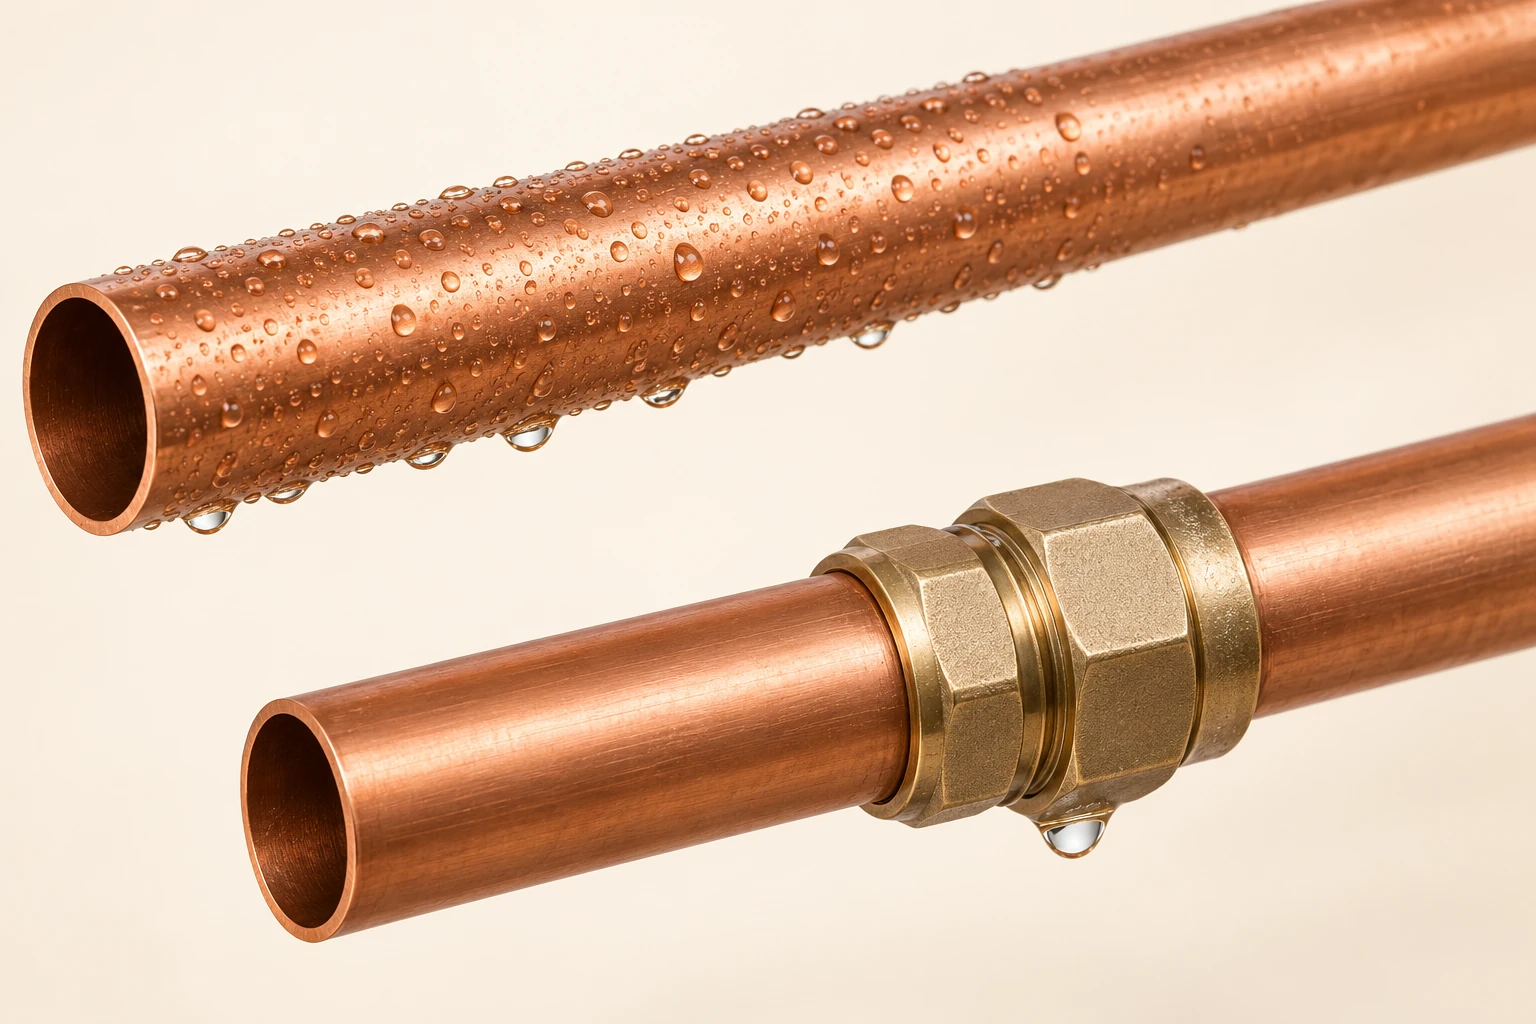
- Widespread beads
Droplets appear along the surface of the upper specimen.
- Drop near a fitting
The lower specimen places a visible drop near a joint.
- Separate specimens
The open ends identify teaching samples, not an operating pressurized installation.
What visible signs deserve a closer look?
A fresh puddle is easy to notice. Other useful signs include a stain, peeling or blistered paint, a distorted wood surface or a change in a familiar finish. The illustration shows a cabinet edge that has swollen and a wall finish with bubbling. These are recognizable conditions to describe, not a hidden-material diagnosis.
An old brown ring on a ceiling and a new wet patch may look related, but a photograph alone cannot date the event or show whether water is still arriving. State what you know: when you first noticed it, whether it visibly changed and whether the surface was assessed. Do not press, puncture or scrape a suspect area to decide how bad it is.
A mark that reappears after painting needs the moisture question reopened. Painting changes the visible finish. It does not, by itself, document a source investigation or the condition of the layers behind the paint. Repeated dampness, mustiness or suspected hidden growth deserves appropriate professional attention.
Keep a photograph that includes a room landmark as well as the closer view. That helps someone find the same corner later. If you already have a dated photograph from before the event, retain it too. Do not wait for another damaging episode just to build a better comparison.
Stay precise about the words. “Dark spotting on the lower wall” describes an appearance. Identifying mould, deciding how materials should be handled and addressing an individual's health concerns require different expertise. The guide's pictures are illustrations; their colours are not a way to identify contamination or judge whether a real area is safe.
Describe the visible change before naming its cause
A distorted cupboard edge, blistered finish and ceiling ring give you useful words for what changed. They are separate surface examples, not a diagnosed house or a before-and-after repair. Appearance alone does not identify the source or date the change.
Choose a part name to highlight its explanation below.
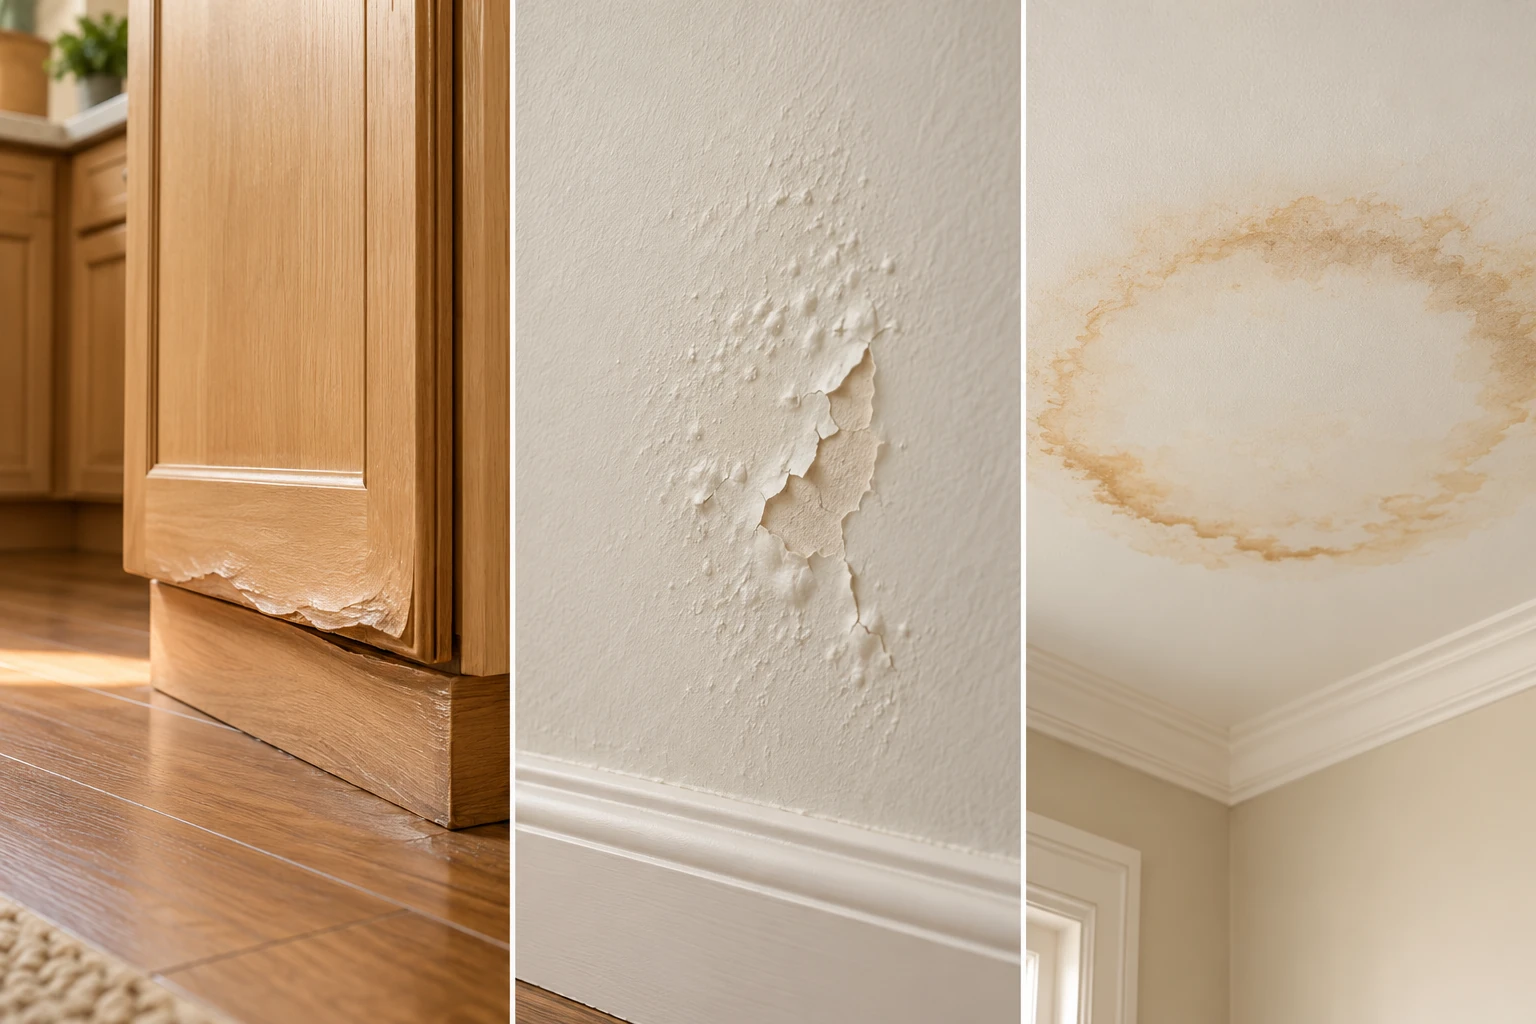
- Cupboard edge
The lower edge has visibly distorted beside the familiar cupboard face.
- Wall finish
The painted surface has localized blistering and peeling.
- Ceiling ring
A visible ring marks part of the ceiling surface.
What can the water meter actually tell me?
A water meter measures water passing through its installed connection. If the reading changes while all connected ordinary uses should be stopped, there is flow to explain. Calgary's household guidance includes taps, toilets, irrigation, humidifiers, water heaters and water softeners in that conversation. Automatic use can make a supposedly quiet interval less quiet than it seems.
Before interpreting a reading, confirm that the meter is yours, safely accessible and understood. A meter shared by a building measures its connected users. A private-well home may not have this kind of utility meter. Do not open meter equipment or operate utility-owned valves to conduct a household experiment.
Record the units exactly as displayed, the start and end readings, the elapsed time and known use. Ask the utility how its specific display updates or reports flow if that is unclear. A meter change shows volume at that point; it does not show which fixture used it or which hidden component, if any, leaked.
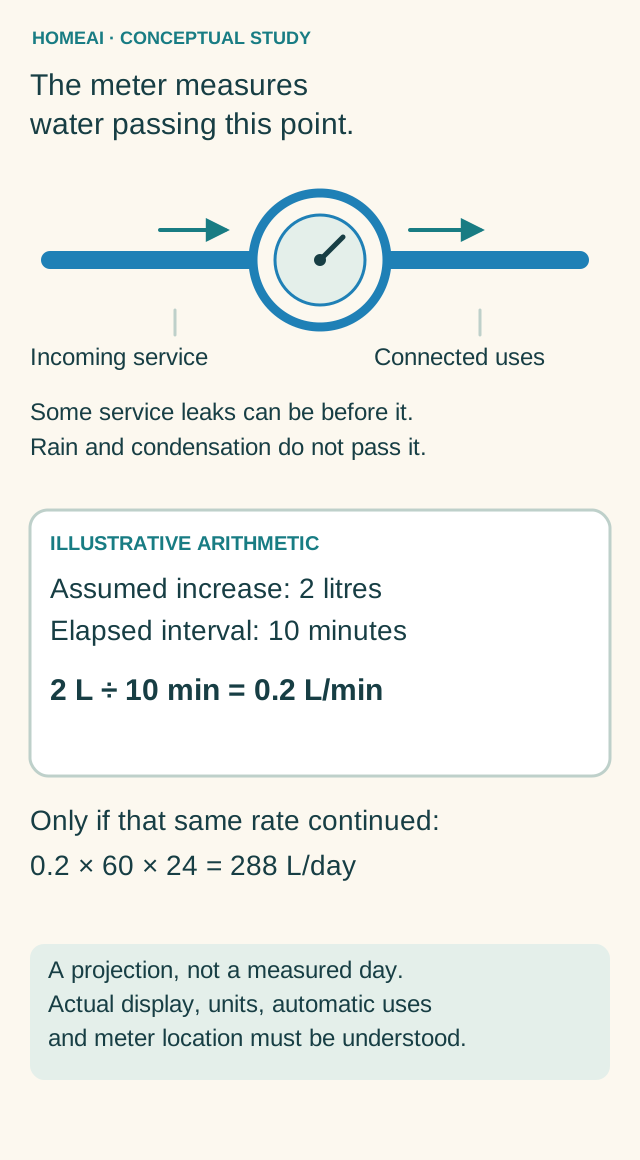
Illustrative calculation: a **2-litre** increase over **10 minutes** is **0.2 litres per minute**. If that exact rate continued for a full 24 hours, it would total **288 litres per day**. The last number is a conditional projection, not a measured day or a billing adjustment.
A zero change during one short interval leaves intermittent events open. It also does not measure rain, condensation or a leak before the meter. The diagram shows these boundaries explicitly so a reassuring-looking number does not end the wrong investigation.
The meter measures water passing this point.
Water meter and measuring point. Passing volume can reveal flow to explain, while rain, condensation and some upstream leaks remain outside that measurement. The arithmetic is illustrative.
Choose a part name to highlight its explanation below.
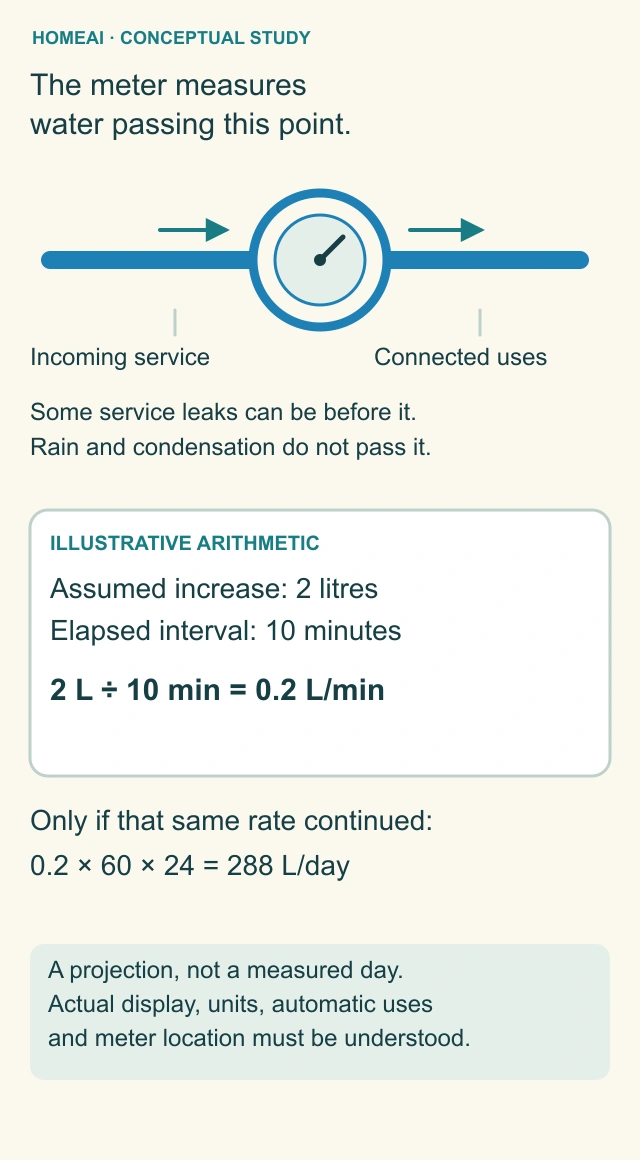
- Measuring point
The meter measures water passing its installed connection. A leak before that point, rain entry and condensation are outside that volume measurement.
- Known uses
Ordinary or automatic uses can explain connected flow. Meter ownership, display units, update behaviour and the actual plumbing arrangement matter.
- Illustrative arithmetic
Assume a measured increase of 2 litres over 10 minutes: 2 L ÷ 10 min = 0.2 L/min. If and only if that exact rate continued for 24 hours, 0.2 L/min × 60 min/h × 24 h/day = 288 L/day. No measured day, real property finding or billing adjustment is supplied.
- A quiet interval
No change during one interval does not rule out intermittent flow or water outside the meter boundary.
The meter measures water passing this point.
Water meter and measuring point. Passing volume can reveal flow to explain, while rain, condensation and some upstream leaks remain outside that measurement. The arithmetic is illustrative.
- Measuring point
- The meter measures water passing its installed connection. A leak before that point, rain entry and condensation are outside that volume measurement.
- Known uses
- Ordinary or automatic uses can explain connected flow. Meter ownership, display units, update behaviour and the actual plumbing arrangement matter.
- Illustrative arithmetic
- Assume a measured increase of 2 litres over 10 minutes: 2 L ÷ 10 min = 0.2 L/min. If and only if that exact rate continued for 24 hours, 0.2 L/min × 60 min/h × 24 h/day = 288 L/day. No measured day, real property finding or billing adjustment is supplied.
- A quiet interval
- No change during one interval does not rule out intermittent flow or water outside the meter boundary.
Read all the diagram text
- HOMEAI · CONCEPTUAL STUDY
- The meter measures water passing this point.
- Incoming service
- Connected uses
- Some service leaks can be before it.
- Rain and condensation do not pass it.
- ILLUSTRATIVE ARITHMETIC
- Assumed increase: 2 litres
- Elapsed interval: 10 minutes
- 2 L ÷ 10 min = 0.2 L/min
- Only if that same rate continued:
- 0.2 × 60 × 24 = 288 L/day
- A projection, not a measured day.
- Actual display, units, automatic uses and meter location must be understood.
Which observations help without creating another leak?
Record the room and a fixed landmark first: “inside the kitchen cabinet, back left corner” is easier to revisit than “under the sink”. Add when you first noticed the water and whether it was already spreading. An overall photograph and a closer view can connect the mark to its surroundings, provided both can be taken safely.
Separate what preceded the event from what caused it. Ordinary dishwashing, an appliance cycle, rainfall or a thaw may be useful context. They are not instructions to repeat the activity. Do not leave a suspected supply running, empty another full sink or spray the wall to make the picture more convincing.
Keep uncertainty in ordinary words. “The upper connection was hidden”, “I found the cabinet already wet” and “I do not know whether it changed overnight” are useful statements. They prevent the next person from relying on a made-up observation. Prior repairs belong in the history with their actual dates and locations.
The observation map groups location, timing and context around the affected area. It is a blank way to organize a report, not a completed inspection. Once immediate safety has been addressed, these details help the provider decide what access and investigation are needed.
Give the wet place a useful address.
Room landmarks and the first visible location. Pair a safely taken overall view with what was happening beforehand; the marker is an example location, not an identified source.
Choose a part name to highlight its explanation below.
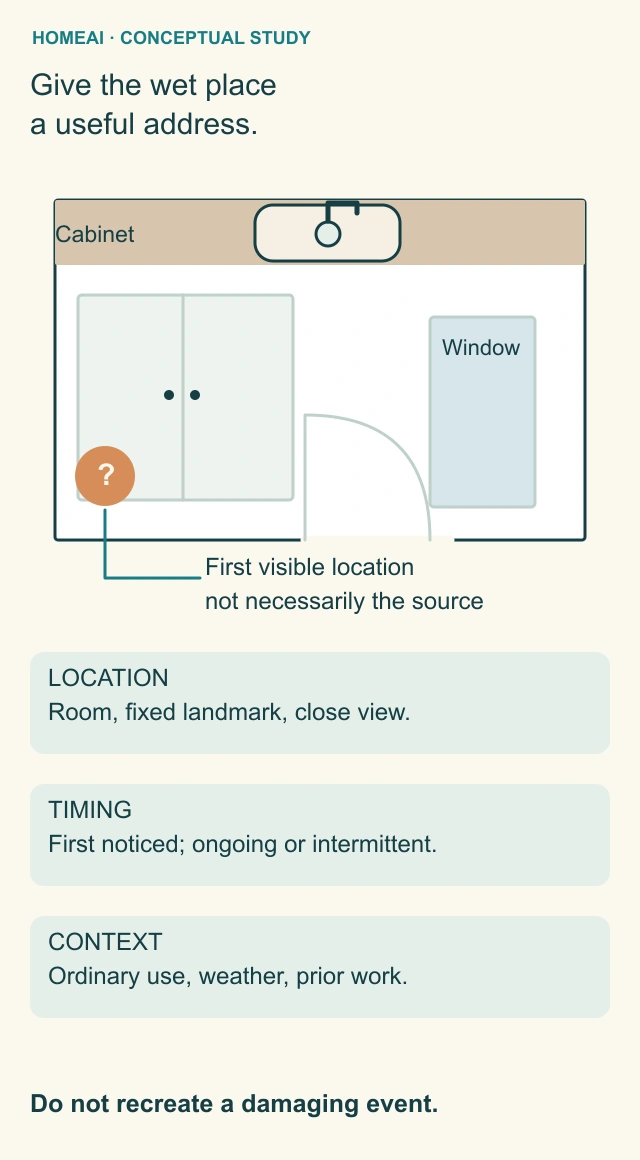
- Location
Describe the room and a fixed landmark. A safe overall photograph connects a close view to the room; the first visible location can be away from the source.
- Timing
Record when it was first noticed and whether it was still happening. State when onset, duration or change is unknown.
- Context
Record ordinary activities or weather already occurring, prior relevant work and actions taken. Timing alone does not diagnose the cause.
- Safe observation
Do not run a suspected leak, deliberately wet a wall, open suspect finishes or enter an unsafe area to obtain a better record. The plan and question marker are conceptual, not actual property findings.
Give the wet place a useful address.
Room landmarks and the first visible location. Pair a safely taken overall view with what was happening beforehand; the marker is an example location, not an identified source.
- Location
- Describe the room and a fixed landmark. A safe overall photograph connects a close view to the room; the first visible location can be away from the source.
- Timing
- Record when it was first noticed and whether it was still happening. State when onset, duration or change is unknown.
- Context
- Record ordinary activities or weather already occurring, prior relevant work and actions taken. Timing alone does not diagnose the cause.
- Safe observation
- Do not run a suspected leak, deliberately wet a wall, open suspect finishes or enter an unsafe area to obtain a better record. The plan and question marker are conceptual, not actual property findings.
Read all the diagram text
- HOMEAI · CONCEPTUAL STUDY
- Give the wet place a useful address.
- Cabinet
- Window
- ?
- First visible location, not necessarily the source
- LOCATION
- Room, fixed landmark, close view.
- TIMING
- First noticed; ongoing or intermittent.
- CONTEXT
- Ordinary use, weather, prior work.
- Do not recreate a damaging event.
What do moisture meters and thermal cameras add?
These tools help an investigator ask better questions about an area that may be wet. A thermal camera shows surface-temperature patterns. It does not look through a wall and directly photograph water. FLIR's guidance explains that a temperature pattern resembling moisture still needs confirmation and that other conditions can create temperature differences.
A material moisture instrument addresses a different question at a chosen material and location. Ask what its scale means, which material it was used on and how the result was checked against appropriate comparisons. Do not treat every displayed number as a universal percentage of water throughout the wall.
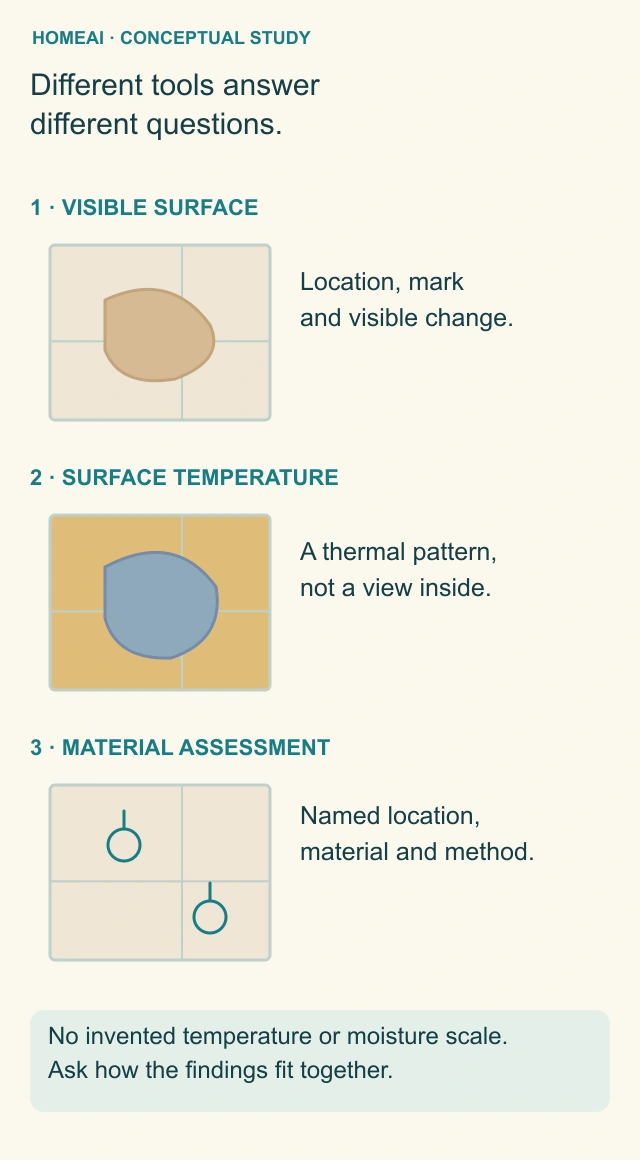
The diagram pairs three views of one illustrative wall: an ordinary surface view, a conceptual temperature pattern and marked assessment locations. The temperature view has no invented Celsius scale or moisture percentage. It shows the kind of comparison a report should explain; it supplies no actual test result.
Useful questions are concrete: “What did this tool measure here?”, “Which material were you checking?” and “How does that result support the source you identified?” If another assessment or controlled access is needed, ask why and what it is expected to resolve.
Avoid buying a tool in the hope that a coloured screen will make concealed investigation straightforward. The operating conditions, instrument method and interpretation matter. Do not insert probes, drill inspection holes or open suspect finishes to imitate a picture. The actual investigation should plan safe access and relevant permissions.
Different tools answer different questions.
Surface view, thermal pattern and material assessment. Each addresses a different question; a coloured thermal patch needs corroboration and is not a photograph of water inside a wall.
Choose a part name to highlight its explanation below.
- Visible surface
The ordinary view records a location and visible appearance. It does not establish the condition of every concealed layer.
- Thermal view
The conceptual colour pattern represents surface-temperature variation, not a view through the wall or a measured moisture result. No Celsius scale, actual camera reading or universal diagnostic shape is supplied.
- Material assessment
Assessment concerns identified materials and locations using an appropriate method. Ask what was measured, what the scale means and how findings were compared or corroborated. The circles are conceptual locations, not a homeowner probing instruction.
- Combining findings
A professional should explain how the tool result supports a finding, what further access or assessment is needed and what remains unresolved.
Different tools answer different questions.
Surface view, thermal pattern and material assessment. Each addresses a different question; a coloured thermal patch needs corroboration and is not a photograph of water inside a wall.
- Visible surface
- The ordinary view records a location and visible appearance. It does not establish the condition of every concealed layer.
- Thermal view
- The conceptual colour pattern represents surface-temperature variation, not a view through the wall or a measured moisture result. No Celsius scale, actual camera reading or universal diagnostic shape is supplied.
- Material assessment
- Assessment concerns identified materials and locations using an appropriate method. Ask what was measured, what the scale means and how findings were compared or corroborated. The circles are conceptual locations, not a homeowner probing instruction.
- Combining findings
- A professional should explain how the tool result supports a finding, what further access or assessment is needed and what remains unresolved.
Read all the diagram text
- HOMEAI · CONCEPTUAL STUDY
- Different tools answer different questions.
- 1 · VISIBLE SURFACE
- Location, mark and visible change.
- 2 · SURFACE TEMPERATURE
- A thermal pattern, not a view inside.
- 3 · MATERIAL ASSESSMENT
- Named location, material and method.
- No invented temperature or moisture scale.
- Ask how the findings fit together.
If the leak stops, are the cabinet and wall finished too?
Not necessarily. Stopping new water and dealing with the materials it reached are different tasks. A plumber may repair the source while the cabinet base, floor layers, insulation or a concealed cavity still need separate assessment and work.
Ask who is responsible for that affected area and what their assignment includes. The useful answer identifies the materials and locations checked, relevant methods, areas that could not be reached and any drying or removal work. It should explain how follow-up will be evaluated rather than treating a dry-looking painted face as the whole wall.
Qualified help is particularly important when water may be contaminated, hidden growth is suspected, a problem keeps returning or cavities cannot dry adequately. Health Canada's January 2023 guide explains these situations and the importance of a defined professional work scope. This article does not provide a household demolition, mould-cleanup or clearance procedure.
Avoid opening a wall or scraping a suspect surface yourself. Appropriate investigation can plan access, permissions and material precautions. A fresh coat of paint can wait until the relevant source and affected-material questions have been addressed.
The repair-scope drawing follows the work across an exposed illustrative assembly: the source location, surrounding materials and later reinstated finish. It explains a sequence of responsibilities. It does not promise that every incident needs the same removal, equipment or duration.
What should the repair cover beyond the leaking part?
Think about three physical jobs. The first is the source: the connection, fixture, weather-entry detail or moisture condition that needs correction. The second is what became wet: cabinet board, flooring, wall layers or another affected area. The third is reinstatement: putting the appropriate finish and usable room back after the relevant work.
Those jobs can involve different people and different decisions. Replacing a supply connector does not tell you whether the cabinet base needs attention. Repainting a ceiling does not explain the route that wet it. Ask which of the three jobs each proposal includes and who will coordinate any work outside it.
A useful affected-material assessment names the locations and materials considered, explains relevant methods and identifies inaccessible areas. Where drying, removal or further investigation is recommended, ask how the next decision will be made. A particular equipment duration or moisture number should not be copied from another home as a universal target.
The scope drawing places these jobs beside different parts of one conceptual assembly. It does not show a required demolition pattern or a repair already completed. Safe access, the actual materials, contamination concerns and the provider’s findings determine what work belongs in your home.
Before accepting an unexplained “all fixed”, ask what was corrected, what surrounding area was assessed and what follow-up remains. The answer should connect to the original wet location. It should also say when an unresolved weather, plumbing or material question needs another specialist.
One wet area can need three different scopes.
Source component, surrounding materials and finish. Correcting the water source, assessing what became wet and reinstating the room are distinct jobs; the actual findings determine the work.
Choose a part name to highlight its explanation below.
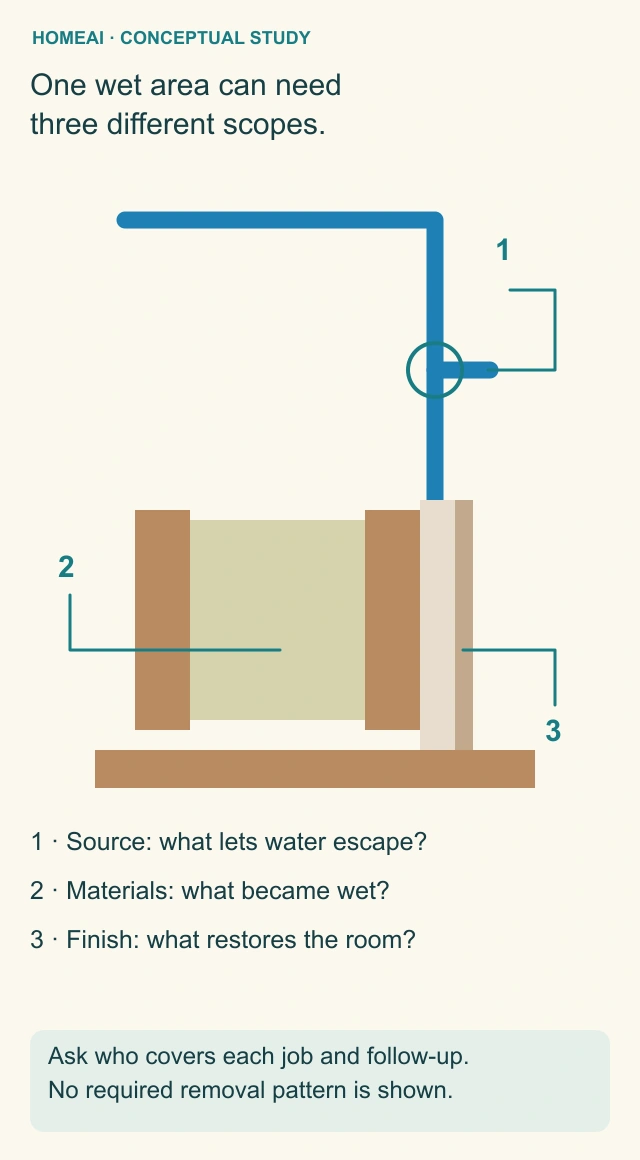
- Source
Identify the actual component, entry detail or moisture condition being corrected and the location and scope of the work. The outlined pipe connection is only a conceptual source location.
- Affected materials
Ask which cabinet, wall, floor or other affected materials were assessed, what methods were relevant, what could not be reached and whether further work is needed. No material condition or drying result is shown.
- Reinstatement
Finish work restores the appropriate surface or usable room after the relevant source and material work. A repainting receipt alone does not document the source investigation or concealed condition.
- Coordination
Ask who is responsible for each job, what the proposal includes and what follow-up remains. The assembly does not prescribe demolition, repair equipment or duration.
One wet area can need three different scopes.
Source component, surrounding materials and finish. Correcting the water source, assessing what became wet and reinstating the room are distinct jobs; the actual findings determine the work.
- Source
- Identify the actual component, entry detail or moisture condition being corrected and the location and scope of the work. The outlined pipe connection is only a conceptual source location.
- Affected materials
- Ask which cabinet, wall, floor or other affected materials were assessed, what methods were relevant, what could not be reached and whether further work is needed. No material condition or drying result is shown.
- Reinstatement
- Finish work restores the appropriate surface or usable room after the relevant source and material work. A repainting receipt alone does not document the source investigation or concealed condition.
- Coordination
- Ask who is responsible for each job, what the proposal includes and what follow-up remains. The assembly does not prescribe demolition, repair equipment or duration.
Read all the diagram text
- HOMEAI · CONCEPTUAL STUDY
- One wet area can need three different scopes.
- 1
- 2
- 3
- 1 · Source: what lets water escape?
- 2 · Materials: what became wet?
- 3 · Finish: what restores the room?
- Ask who covers each job and follow-up.
- No required removal pattern is shown.
Which professional fits the problem, and what should their visit cover?
For suspected incoming water, fixture connections or a drain problem, start by describing the issue to a plumber. For a concern linked to rain, snowmelt or an unclear path through the roof and wall, ask for relevant building-envelope or drainage expertise. A moisture or restoration specialist may be needed for affected materials. These jobs can overlap; ask who will coordinate them.
Tell the provider where water was first visible, when it appeared, whether it is ongoing and what was happening beforehand. Include ordinary fixture or appliance use, recent weather, safe photographs, previous relevant work and actions already taken. Be equally clear about what you did not see.
Before approving work, ask which question the appointment is intended to answer. Will it investigate a source, repair a known component, assess wet materials or do several of those jobs? What access is required? Who will explain an unresolved result? A broad label such as “leak detection” is less useful than a scope tied to your room and concern.
In a shared building, tell management about possible routes between homes and common areas. A provider attending only your unit may not have access or permission to inspect another unit or shared system. In a well-supplied home or an unusual service arrangement, identify that at booking rather than assuming a municipal-meter method applies.
Canadian weather, construction and service arrangements vary. The general distinctions in this guide travel well; a local utility's ownership boundary, shutoff procedure, work permission or contractor requirements should be confirmed locally. No image, remote explanation or generic checklist replaces the actual property investigation.
What should I keep after the work?
Keep the original symptom beside the actual finding and repair. Useful records name the component and location, work performed, date, relevant checks after the work and anything left inaccessible or unresolved. Keep any separate affected-material, drying or restoration report with them.
An invoice saying “plumbing repaired” may document a billed task without explaining which part was repaired or why. Ask the provider to clarify their own record. Do not turn a connection replacement into a claim that every pipe or concealed layer was inspected.
A supply-connector receipt and a repainting receipt answer different questions. Compare their actual locations and dates with the current concern before assuming the source and the damp materials were both addressed. Missing information calls for a specific question, not an invented repair history.
Note recurrence or new changes after work without deliberately recreating a damaging event. A dry observation with its ordinary-use and weather context is useful follow-up. It does not prove that every concealed layer is dry or that an intermittent problem can never return.
For a future sale, aim for an understandable account: what was noticed, what was found, what was done and what still needs attention. For today’s call, start even more simply: where is it wet, is it happening now, and which source and affected-area questions will the appointment cover?
Match the record to the actual wet place.
Location, component and work scope. A connection task and a cabinet-material assessment answer different questions; this illustrative excerpt shows how to spot the gap in a record.
Choose a part name to highlight its explanation below.
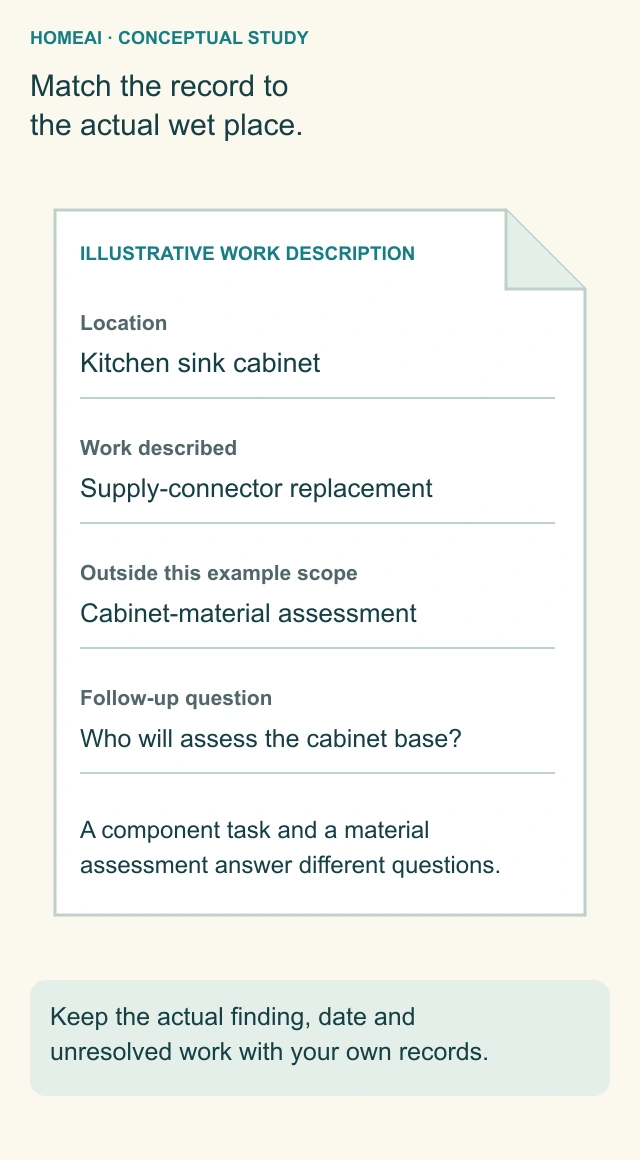
- Location and component
Match the actual record to the room, location and component that concerned you. A general task description may need clarification.
- Work and exclusions
The illustrative description concerns a sink supply-connector replacement and excludes cabinet-material assessment. Those are different jobs; no actual repair or finding is supplied.
- Follow-up
Ask who will assess the affected cabinet base and what that separate scope covers. Keep the provider’s actual finding, work, date and unresolved items.
- Original records
An illustrative form teaches how to compare scopes. It is not an invoice, inspection result or completed work record for a real property.
Match the record to the actual wet place.
Location, component and work scope. A connection task and a cabinet-material assessment answer different questions; this illustrative excerpt shows how to spot the gap in a record.
- Location and component
- Match the actual record to the room, location and component that concerned you. A general task description may need clarification.
- Work and exclusions
- The illustrative description concerns a sink supply-connector replacement and excludes cabinet-material assessment. Those are different jobs; no actual repair or finding is supplied.
- Follow-up
- Ask who will assess the affected cabinet base and what that separate scope covers. Keep the provider’s actual finding, work, date and unresolved items.
- Original records
- An illustrative form teaches how to compare scopes. It is not an invoice, inspection result or completed work record for a real property.
Read all the diagram text
- HOMEAI · CONCEPTUAL STUDY
- Match the record to the actual wet place.
- ILLUSTRATIVE WORK DESCRIPTION
- Location
- Kitchen sink cabinet
- Work described
- Supply-connector replacement
- Outside this example scope
- Cabinet-material assessment
- Follow-up question
- Who will assess the cabinet base?
- A component task and a material assessment answer different questions.
- Keep the actual finding, date and unresolved work with your own records.
Keep learning about the connected parts
- Leak sensors and automatic shutoff: understand detection, valve action and response
- Sump pumps and backwater valves: know each part’s job
- Follow rain away from your foundation
- A line in the basement: build a useful foundation observation record
- Why damp walls and mould keep coming back
- After a home flood: understand the recovery before the room looks finished
- Wood-destroying insects: separate the pest, moisture and structural questions
- Hiring a repair contractor: carry evidence into scope, changes and completion
Canadian context and authorities · Visual atlas · Learning labs
Leak-rate lab
Turn two meter observations into an estimated flow.
Daily volume = (litres ÷ minutes) × 1,440
Stop all normal water uses and verify meter units. The estimate cannot locate a leak or rule out intermittent flow.
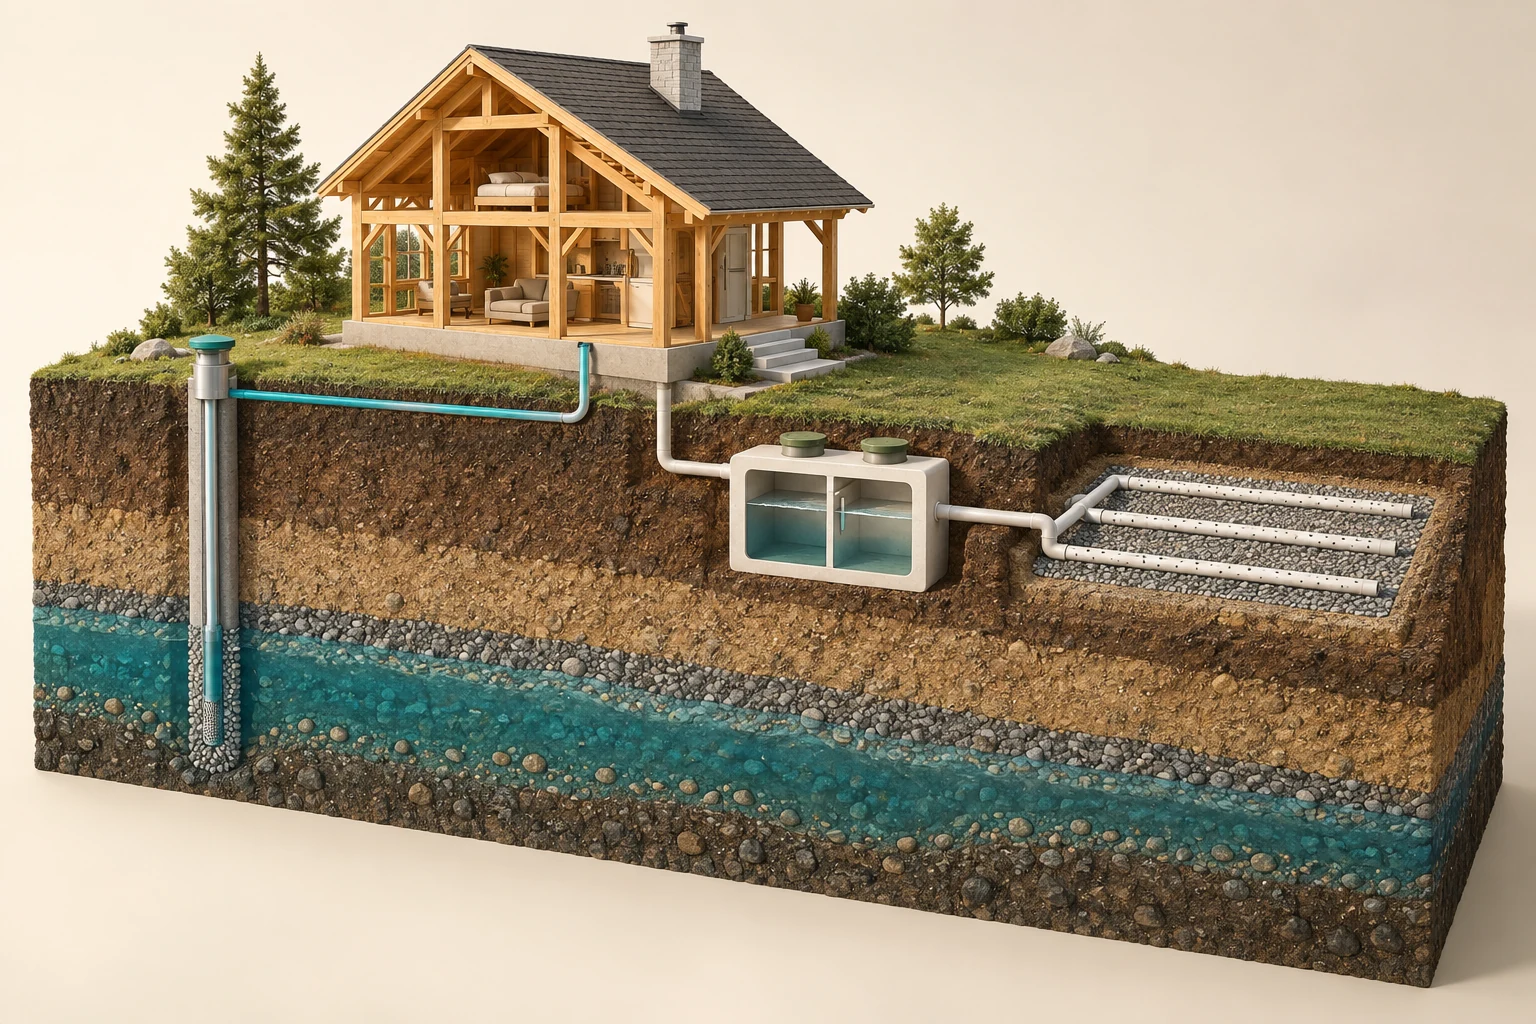
Well water and wastewater are different systems.
An open timber house above a soil section, with a capped well and a separate sectioned tank. A teal house-water route and a pale wastewater route toward parallel field laterals. Illustrative ground layers and a blue-green subsurface water-bearing layer.
The evidence the illustration cannot supply
Water quality, well construction, yield, protection and appropriate treatment. Septic inspection history, approvals, soil treatment performance and actual operation. Site boundaries, appropriate separation, groundwater conditions and local requirements. This is a separate conceptual teaching house, not another view of a surveyed property.
Know the parts.
Know what the words mean.
- First visible location
- The place where water was first noticed. Water may have travelled there from a different source.
- Repair scope
- The named location, component and tasks covered by the work; other wet materials may need a separate assessment.
- Supply connection
- The incoming-water connection feeding a fixture or appliance.
- Fixture drain
- The pipe route carrying used water away from a sink or another fixture.
- Trap
- A curved drain part that retains a water seal to help keep sewer gases out of the room.
- Slip joint
- A drain connection in which a tube enters a receiving fitting, with a washer and retaining nut in the illustrated type.
- Capillary action
- Liquid water moving through narrow spaces or porous materials, including sideways or upward; often called wicking.
- Condensation
- Water vapour changing into liquid at a surface cold enough for that change under the surrounding conditions.
- Affected materials
- The cabinet, wall, floor or other materials reached by water, beyond the source component itself.
Questions to bring
to the conversation.
- Where was water first noticed, and what was happening beforehand?
- Which ordinary or automatic water uses belong to the meter observation?
- Can the provider safely assess the suspected route and relevant access?
- Which actual component and location does the repair record describe?
- Who assessed the affected materials and what follow-up remains?
Separate a showing observation, an existing record and a new professional assessment. Unknown means a question remains; it does not automatically mean a defect.
Use the evidence planner ↗Go to the source.
Original HomeAI explanation informed by these public references. Sources support the underlying guidance; they have not reviewed or endorsed HomeAI. Diagrams are conceptual, and calculator outputs depend on your inputs.
Utility and flood-protection guidance must match the actual municipality, meter boundary and home. A short interval does not rule out intermittent water use.
Utility responsibilities and work requirements vary by location. Confirm them with the relevant local provider.
Publication & source review
First published .
Sources reviewed .
- City of Calgary · Water leaks and basic repairs
- City of Calgary · Home maintenance
- City of Ottawa · Preventing basement flooding
- Electrical Safety Authority · Flood safety
- Health Canada · Addressing indoor moisture and mould
- Natural Resources Canada · How your house works
- Health Canada · Pollutants in building materials
- City of Calgary · Water leaks and basic repairs
- City of Calgary · Water service line leaks
- FLIR · How to detect a water leak with thermal imaging
- City of Toronto · Pipe leak or burst
- Oatey Canada · Sewer gas odour in your house and what to do about it
- Oatey · How to Install a P-Trap
Have a question about your home?
Start with the symptom, timing and what you have observed.
Ask HomeAI